How To Clear Cache in Chrome: The Ultimate Step-by-Step Guide for 2026
 Isabella Bartlett
Is your Chrome browser acting sluggish, loading outdated pages, or throwing strange errors out of nowhere? The culprit is almost always a bloated cache. Clearing your cache is one of the fastest, easiest fixes you can do — and it takes less than 60 seconds once you know where to look.
Whether you're troubleshooting a website that won't load correctly or simply doing a routine browser cleanup, this guide walks you through every method to clear cache in Chrome in 2026 — from the classic settings menu to keyboard shortcuts and advanced options for power users.
What Is Browser Cache and Why Should You Clear It?
Every time you visit a website, Chrome saves pieces of that site — images, scripts, stylesheets — in a local storage area called the cache. The idea is smart: next time you visit that page, Chrome loads the stored files instead of downloading everything again, making your browsing faster.
However, over time this cached data piles up and becomes outdated. When a website updates its design or content, your browser might still serve the old cached version, causing display glitches, login issues, or broken layouts. In 2026, with websites updating more dynamically than ever — including AI-powered interfaces and real-time content — a stale cache is a more common problem than before.
Pro Tip: Clearing your cache does not delete your passwords, bookmarks, or browser history unless you specifically select those options. It only removes temporary stored files, so it is completely safe to do regularly.
Method 1: Clear Cache Using Chrome Settings Menu
This is the most common and beginner-friendly method to clear your cache in Chrome. It gives you full control over what data you delete and how far back you want to go. This method works identically on Windows, macOS, and ChromeOS in 2026.
Follow these exact steps:
- Open Google Chrome on your device.
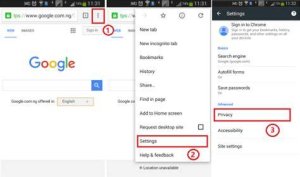
- Click the three-dot menu (⋮) in the top-right corner of the browser window.
- Select Settings from the dropdown menu.
- In the left sidebar, click on Privacy and Security.
- Click Delete browsing data (or "Clear browsing data" depending on your Chrome version).
- A dialog box will appear. Under the Basic tab, check Cached images and files.
- Set the Time range to All time for a full clean.
- Click the blue Delete data button.
Pro Tip: If you only want to fix a specific broken website without wiping your entire cache, set the time range to Last 24 hours or Last 7 days. This clears recent files while keeping older cached data intact for faster loading of other sites.
Method 2: Use the Keyboard Shortcut for Instant Access
If you want to get to the cache-clearing dialog in the fastest way possible, Chrome has a dedicated keyboard shortcut that skips all the menu navigation entirely. This is a favorite trick among developers, IT professionals, and power users who clear cache frequently.
Simply press:
- Windows / Linux:
Ctrl + Shift + Delete - Mac:
Command + Shift + Delete
This instantly opens the Delete Browsing Data panel directly, without needing to navigate through any menus. From there, check Cached images and files, choose your time range, and hit Delete data.
Pro Tip: Bookmark this shortcut in your memory — it works across nearly all Chromium-based browsers in 2026, including Microsoft Edge, Brave, and Opera, not just Google Chrome.
Method 3: Hard Refresh to Clear Cache for a Single Page
Sometimes you don't need to clear your entire cache — you just need Chrome to reload one specific page fresh from the server. This is called a Hard Refresh, and it forces Chrome to bypass the cache for that single page without touching anything else.
Here's how to do a hard refresh:
- Windows / Linux:
Ctrl + Shift + RorCtrl + F5 - Mac:
Command + Shift + R
Alternatively, you can hold Shift and click the Reload button (↻) in the address bar. Chrome will reload the page completely fresh, ignoring any cached version it has stored locally.
Pro Tip: For web developers and designers testing live site changes in 2026, a hard refresh is your best friend. It lets you instantly see updated CSS, JavaScript, or HTML without clearing the entire browser cache and slowing down other pages.
Method 4: Clear Cache for a Specific Website Only
Chrome's 2026 version includes a powerful per-site cache management feature that allows you to delete cached data for just one website without affecting any other browsing data. This is ideal when a single site is misbehaving while everything else works perfectly.
Follow these steps:
- Navigate to the website that is giving you trouble.
- Click the lock icon (or info icon) to the left of the URL in the address bar.
- Select Site settings from the dropdown.
- On the site settings page, click the Delete data or Clear data button.
- Confirm by clicking Delete in the popup dialog.
This will wipe all cache, cookies, and site data specifically for that domain, effectively giving you a clean slate for that website alone. In 2026, this method is especially useful for web apps, banking portals, and streaming services that store complex session data.
Pro Tip: After clearing site-specific data, do not immediately refresh — instead, close the tab entirely and reopen the website fresh. This ensures Chrome establishes a completely new connection rather than reusing an old session in memory.
Method 5: Clear Cache Using Chrome's Address Bar Shortcut
Chrome has a hidden direct URL that takes you straight to the browsing data deletion page — no menus, no clicking around. This is one of the quickest lesser-known tricks that Chrome power users rely on in 2026.
Simply type or paste the following into your Chrome address bar and hit Enter:
chrome://settings/clearBrowserData
This opens the Delete Browsing Data dialog instantly. From there, select Cached images and files, set your preferred time range, and click Delete data. You can also bookmark this URL for one-click access anytime you need a quick cache clear.
Pro Tip: Add chrome://settings/clearBrowserData to your Chrome bookmarks bar with a short name like "Clear Cache." With one click, you'll have instant access to the clearing dialog anytime — a real time-saver if you clear cache regularly for work or development purposes.
How to Set Chrome to Clear Cache Automatically
If you find yourself clearing cache constantly, Chrome in 2026 allows you to automate the process so that cached data and cookies are deleted every time you close the browser. This is a great option for shared computers, privacy-conscious users, or anyone who wants a fresh start every session.
Here's how to enable automatic cache clearing:
- Go to Chrome Settings → Privacy and Security.
- Click on Third-party cookies or Cookies and other site data.
- Enable the toggle for "Clear cookies and site data when you close all windows".
Note that this setting primarily targets cookies and site data. For full cache automation, consider using a trusted Chrome extension like "Clear Cache" by Benjamin Bojko, which adds a one-click toolbar button and supports auto-clearing on browser startup or close.
Pro Tip: If you use Chrome for both personal and work browsing, consider setting up two separate Chrome profiles — one with auto-clear enabled for privacy, and one with cache preserved for faster loading of your frequently visited work tools.
Common Problems Solved by Clearing Chrome Cache
Clearing cache isn't just about freeing up storage — it directly resolves a wide range of frustrating Chrome issues that users in 2026 commonly encounter. Knowing what problems it fixes helps you diagnose issues faster and decide when clearing cache is the right solution.
Here are the most common issues resolved by clearing Chrome cache:
- Website not loading correctly — Old cached files conflict with updated site code.
- Login loops or being stuck logged out — Corrupted session cookies and cached auth data.
- Outdated content appearing — Chrome serves old cached pages instead of the live version.
- Slow browser performance — Excessive cache storage slows read/write operations.
- Error messages like ERR_CACHE_MISS — Directly caused by corrupted cache entries.
- Broken images or missing page elements — Partially cached files that failed to load completely.
Pro Tip: If clearing cache alone doesn't fix your issue, try also clearing cookies at the same time. Many browser problems are caused by a combination of stale cache and expired or corrupted cookies working together to break the browsing experience.
Final Thoughts
Knowing how to clear cache in Chrome is one of the most valuable browser skills you can have in 2026. Whether you use the Settings menu, the lightning-fast keyboard shortcut Ctrl + Shift + Delete, a targeted per-site data wipe, or the direct URL method, keeping your cache clean means a faster, more reliable, and error-free browsing experience. Make it a habit to clear your Chrome cache at least once a month — your browser will thank you with snappier performance and fewer frustrating glitches. Now that you know every method, you're fully equipped to handle any cache-related Chrome issue like a pro.